What if your furniture could age gracefully, without losing its charm? Wood refinishing is like taking care of the pieces you already love.
Under the worn varnish and faint scratches, a remarkable story often waits to shine again. Refinishing can go a long way in preserving the story and extending the beauty of handcrafted furniture.
If you are new to this idea, here is the right place to start. House of Chippendale will walk you through the essentials, step by step, so you can approach your first project with confidence, respect for the material, and just enough patience to do it right.
Shall we begin?
What Is Wood Refinishing?
Where restoration tries to keep things exactly as they were, wood refinishing gives you more freedom. It lets you reimagine the tone, the finish, the texture, and even the presence of a piece.
Perhaps that honeyed oak no longer suits your home’s mood, and you would prefer a richer espresso stain. Or maybe you want to soften the gloss to something more velvety, more lived-in. Every decision, from the sheen to the depth of color, shapes how the piece speaks in the room.
Wood refinishing is so rewarding, especially for beginners, because it feels personal. You are not just preserving something beautiful. This allows you to give it relevance again. And when the grain catches the light just right, it is hard not to feel a little proud of the hands that brought it back to life.
Also Read: What Is Furniture Restoration and How Does It Work?
Essential Tools and Materials for Wood Refinishing
Before the artistry begins, wood refinishing starts with preparation, which means gathering the right tools. Like a chef reaching for quality ingredients, the success of any refinishing project lies in the materials you choose and how you use them.
Here are some essential tools and materials you can use, including:
1. Sandpaper
Use coarse grit to remove the old finish, then move to finer grades to smooth the surface gradually. Think of it as preparing a canvas: You want it clean, even, and receptive.
2. Stain
This one adds depth and personality. Choose a tone that complements the natural grain or brings a new narrative to the piece. But remember, always test it first. Wood reacts differently depending on age, species, and past treatments.
3. Brushes and Rags
Both tools have their place for applying stain and finish. Brushes give control in detailed areas, while lint-free rags offer smooth, even coverage over broad surfaces.
4. Sealant
Your chosen finish locks in the beauty and protects the surface. The proper sealant enhances the sheen and ensures your work endures gracefully.
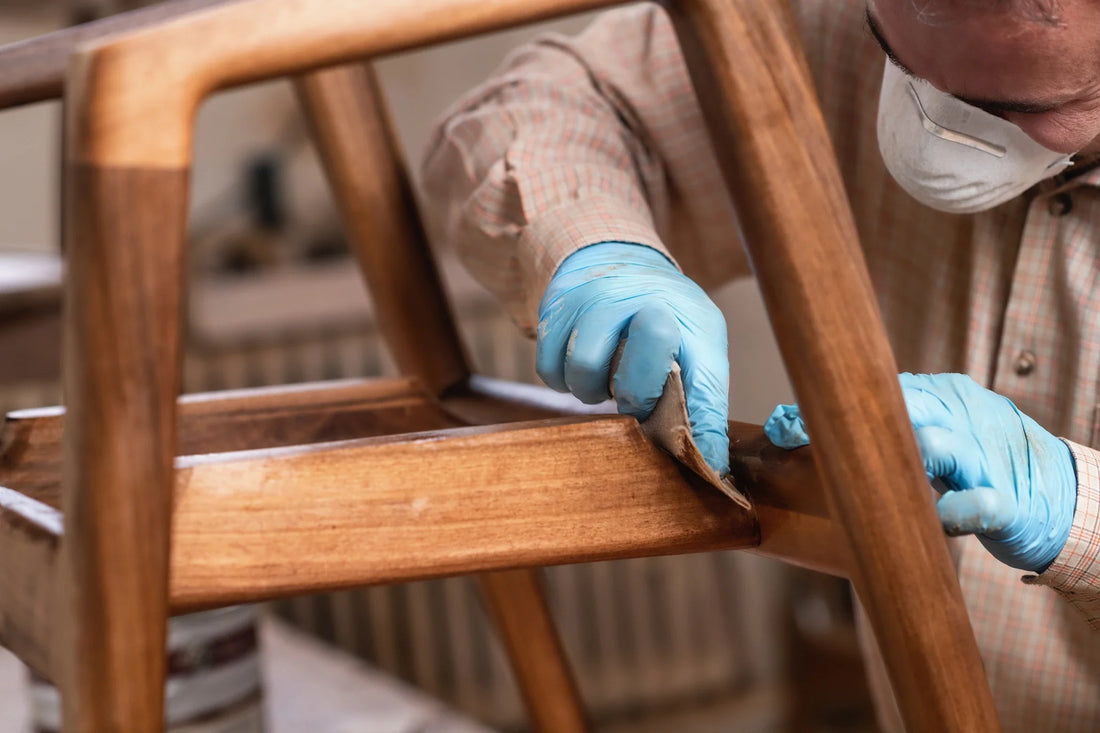
5. Protective Gear
Gloves, goggles, and masks may not feel glamorous, but they are non-negotiable. A refined result is best achieved when you can focus without distraction or concern for your safety.
Step-by-Step Wood Refinishing Process

Wood refinishing allows you to preserve that story while revealing a renewed surface beneath the wear of time. While the process may seem daunting at first glance, think of each step as an intimate dialogue between you and the piece.
Let us walk through the essential steps to help you approach your first wood refinishing project confidently and carefully.
1. Preparation and Cleaning
Before you touch a single tool, pause and examine. Begin by gently cleaning the surface with a mild wood-safe solution to remove dust, oils, and debris.
If an old finish is present, it must be removed, but not forcefully. Stripping wood requires patience. Harsh scrubbing can scar the grain; instead, take the time to assess what you are working with.
Is it solid wood or veneer? How deep is the original finish? A discerning eye at this stage will prevent costly mistakes later.
2. Sanding the Surface
Sanding is where the transformation begins in earnest. Start with a coarser grit (such as 80 or 100) to strip away remnants of the previous finish, then gradually move to finer grades (150 to 220) to smooth the surface.
Always sand with the grain, and never against it. This preserves the natural flow of the wood’s character.
Consider using a sanding sponge or detail tool if the piece includes intricate carvings or curves. And remember, this step sets the tone for how beautifully your new wood refinishing efforts will settle in.
3. Applying Stain or Paint
Once your surface is clean and even, it is time to bring color back to the wood. A well-chosen stain can deepen walnut's warmth or highlight oak's golden tones
Paint, on the other hand, offers a complete reimagination. Whichever path you choose, apply with care. Use a high-quality brush or a lint-free rag, working in thin, even coats.
Test your color on a discreet section first because it may behave differently depending on the wood species or existing grain.
4. Sealing and Protecting
A proper finish is what separates a weekend project from a lasting piece. Your final layer should enhance, not mask, the refinished surface.
Apply in long, smooth strokes, and allow adequate drying time between coats. Sealing protects the surface and completes the wood refinishing process. It gives the piece a subtle glow and ensures its charm endures for years to come.
Common Mistakes to Avoid in Wood Refinishing

It is tempting to rush the process, especially for beginners. There is an eagerness to see the final glow without first honoring the groundwork. But every misstep leaves its mark, quite literally. A cloudy finish, blotchy stain, or uneven grain is often the result of overlooked details.
Let us slow down and walk through the common mistakes that can undo even the most well-meaning refinishing project.
1. Skipping or Rushing the Sanding Process
Sanding is setting the stage for everything that follows. Uneven pressure, using the wrong grit, or simply not spending enough time on it can lead to an inconsistent surface that no stain can fix. Take your time and let each stroke reveal the texture, and do not move forward until it feels just right.
2. Applying Stain Too Heavily or Unevenly
One of the subtler challenges in wood refinishing is learning restraint. Overloading your brush or failing to wipe off the excess stain can lead to blotches, drips, or unnatural darkness in some areas.
Always test your stain on a hidden spot, apply in thin layers, and let the wood speak, rather than forcing a color upon it.
3. Overlooking Ventilation
A beautifully restored piece means little if you work in a space that leaves you lightheaded or overwhelmed by fumes. Proper airflow is not optional. It protects your health and helps finish curing evenly. Although outdoors is best, if you must work indoors, keep windows open and fans running throughout the process.
4. Choosing the Wrong Finish or Skipping It Altogether
Once the wood refinishing process nears the end, many feel tempted to stop there. But without a proper sealant, your work will not last.
Select a finish that suits the wood and the room it will live in. Satin varnish offers timeless elegance, while polyurethane lends a resilient shield for high-traffic areas.
5. Neglecting to Prep the Workspace
You do not need a complete workshop to get started, but your workspace matters. Refinishing furniture on a wobbly table or cluttered room only invites mistakes. A clean, stable surface and a thoughtful layout make each step feel calmer and more precise.
Why Choose Handmade Mahogany Furniture for Refinishing?
Wood refinishing works exceptionally well on mahogany due to its incredible durability. Mahogany is dense and stable, so it will not warp or splinter easily during refinishing. Its fine grain absorbs stain beautifully, creating a rich, dimensional finish that feels luxurious and timeless.
Refinishing handmade pieces, like those from the House of Chippendale, is gratifying. Each curve, joint, and carved detail is crafted to last and be cared for. With proper wood refinishing, these elements are elevated.
Unlike mass-produced furniture that often uses veneer or synthetic finishes, handcrafted mahogany responds well to sanding and sealing, allowing the original artistry to shine.
Also Read: Wood Finishes: Different Types and Their Benefits
Wood refinishing is a quiet act of care. Especially when the piece in question is made of solid mahogany, shaped by hand, and meant to last for generations. In choosing to refinish rather than replace, you are honoring the time, skill, and intention behind it.
This is where furniture becomes personal. Every pass of the cloth, every layer of finish applied, feels like a dialogue with the maker, which deepens your connection to the piece. And when that furniture comes from a place like House of Chippendale, the experience becomes even more meaningful.
Our craftsmanship is crafted to be lived with, looked after, and passed down.
If you are ready to embrace the quiet reward of caring for true craftsmanship, we invite you to explore our collection and let our timeless design become part of your home’s story.


